The Alchemist’s Brew: Your Comprehensive Guide to Making the Best Homemade Ginger Shots
There are moments in life when you stumble upon a simple truth, a tiny ritual that quietly, profoundly, transforms your daily existence. For me, that truth arrived in a shot glass, fiery and golden, brimming with the raw, potent essence of ginger. This isn’t just a recipe; it’s an invitation to a journey, a deep dive into the art and science of crafting the ultimate homemade ginger shot. It’s a story of discovery, experimentation, and ultimately, empowerment – becoming the alchemist of your own well-being.
The Spark of Discovery: Why Ginger Shots?
I remember my first encounter with a ginger shot. It was in a bustling health food café, amidst the whir of blenders and the earthy aroma of spirulina. Skeptical but curious, I paid the exorbitant price for a tiny vial of what looked like concentrated sunlight. The first sip was an explosion – a sharp, spicy, almost violent awakening that jolted every cell in my body. My eyes watered, my sinuses cleared, and a warmth spread through my chest. I felt… alive.
But the price tag was a deterrent. Could I replicate this magic at home? Could I harness this raw power without draining my wallet? This question became my personal quest, leading me down a rabbit hole of research, ingredient sourcing, and countless kitchen experiments. What I discovered was not just a cost-effective alternative, but a superior product, infused with intention and tailored to my own body’s needs.
This guide is for the discerning, the curious, the health-conscious individual who understands that true wellness is cultivated, not bought off a shelf. You’re not just looking for a recipe; you’re seeking a deeper understanding, a mastery of ingredients, and the satisfaction of creating something truly vital with your own hands. So, let’s embark on this alchemical journey together.
>
Chapter 1: The Root of It All – Unveiling Ginger’s Majesty
Before we even consider the shot, we must first understand its star player: Zingiber officinale, or ginger. This gnarled, unassuming root has been revered for millennia, not just as a culinary spice, but as a powerhouse of medicinal properties across cultures, from ancient India and China to the Roman Empire. Its story is as rich and complex as its flavor.
A History Steeped in Healing:
Ginger’s journey began in Southeast Asia, spreading through trade routes to become a staple in traditional medicine systems like Ayurveda and Traditional Chinese Medicine. It was prescribed for everything from digestive woes and nausea to inflammation and common colds. The ancients intuitively understood what modern science is now meticulously proving.
The Bioactive Symphony: What Makes Ginger So Powerful?
The magic of ginger lies in its complex chemical composition. It’s not just one compound, but a symphony of volatile oils and pungent phenolic compounds that work in concert. The most significant players, especially when consumed raw in a shot, are:
- Gingerols: These are the primary active compounds in fresh ginger, responsible for much of its pungent flavor and its potent anti-inflammatory and antioxidant effects. When ginger is cooked or dried, gingerols transform into shogaols.
- Shogaols: These compounds are even more pungent and possess greater anti-inflammatory and antioxidant activity than gingerols. They are especially prevalent in dried or aged ginger, but a small amount is present in fresh ginger and can increase over time.
- Zingerone: This compound gives cooked ginger its sweet, spicy aroma. While less prominent in fresh ginger, it contributes to the overall flavor profile.
The Science-Backed Benefits: Why We Crave the Zing
For the knowledgeable audience, merely stating "ginger is good for you" isn’t enough. Let’s delve into the how:
- Potent Anti-inflammatory: Gingerols and shogaols are powerful inhibitors of pro-inflammatory enzymes like COX-2 (cyclooxygenase-2) and 5-LOX (5-lipoxygenase), similar to how some NSAIDs work, but without the associated side effects. This makes ginger invaluable for conditions like osteoarthritis, muscle soreness, and chronic inflammatory states.
- Antioxidant Powerhouse: These compounds also scavenge free radicals, protecting cells from oxidative damage, which is a key factor in aging and many chronic diseases.
- Digestive Dynamo: Ginger is a natural carminative, meaning it helps expel gas, and a prokinetic agent, accelerating gastric emptying. It stimulates digestive enzymes, soothes the gut lining, and is famously effective at combating nausea (morning sickness, motion sickness, chemotherapy-induced nausea) by influencing serotonin receptors in the gut and brain.
- Immune System Support: While not a cure-all, ginger’s anti-inflammatory and antimicrobial properties can help support a healthy immune response, particularly against respiratory infections. It promotes healthy circulation, helping to deliver immune cells more efficiently.
- Pain Relief: Beyond inflammation, ginger has analgesic properties, potentially reducing muscle pain after exercise and mitigating menstrual cramps.
- Cardiovascular Health: Some research suggests ginger can help lower blood pressure, improve lipid profiles, and prevent blood clot formation, contributing to overall heart health.
My Personal Awakening to Ginger’s Power:
My journey with ginger began not just with taste, but with need. Chronic digestive discomfort and persistent muscle soreness from an active lifestyle had me constantly seeking remedies. While I’d always appreciated ginger in stir-fries, it wasn’t until I committed to the concentrated shot that its true power unfurled. The daily ritual became a cornerstone of my wellness strategy, alleviating bloating, reducing post-workout inflammation, and providing a noticeable lift in energy. It was no longer just a spice; it was a daily dose of vibrant vitality.
>
Chapter 2: Beyond the Basics – Crafting Your Elixir
The "best" ginger shot isn’t just about ginger; it’s about the synergistic dance of thoughtfully chosen ingredients. Each component plays a vital role, enhancing flavor, boosting efficacy, and creating a balanced, potent elixir.
The Core Ingredients: The Unshakeable Foundation
-
Ginger (The Star):
- Selection is Key: Always opt for organic ginger if possible. The skin contains beneficial compounds, and avoiding pesticides is paramount. Look for firm, smooth roots with taut skin, free from mold, soft spots, or shriveling. The more pungent the aroma, the fresher and more potent it likely is.
- Preparation – To Peel or Not to Peel? This is a hotly debated topic among ginger aficionados.
- No Peel (My Preference): If your ginger is organic and thoroughly washed, I advocate for leaving the skin on. Many beneficial compounds, especially just beneath the skin, would otherwise be lost. A good scrub with a vegetable brush is sufficient.
- Peeled: If your ginger isn’t organic, or if you prefer a smoother, less earthy flavor, peeling is fine. The easiest way to peel ginger is with the edge of a spoon, scraping away the thin skin rather than using a peeler, which removes too much of the valuable flesh.
- Quantity: For a concentrated shot, you’re looking for a significant amount. A good starting point is 1-2 inches of ginger root per 1-2 ounce shot, but this will vary based on your juicing method and desired intensity.
-
Citrus (The Brightener & Booster):
- Lemon or Lime: These aren’t just for flavor. Their high Vitamin C content provides additional antioxidant and immune support. The acidity also helps to "cut through" the intensity of the ginger, brightening the flavor profile. Some believe the acidity aids in the extraction of ginger’s compounds.
- Selection: Organic, fresh lemons or limes are non-negotiable. Their zest contains volatile oils that contribute to the overall aroma and flavor.
- Quantity: Typically, half a lemon or lime per shot is a good starting point. Adjust to taste.
-
Water (The Diluent & Vehicle):
- Quality Matters: Use filtered, distilled, or spring water. Tap water, depending on your location, can introduce unwanted chemicals or flavors that detract from the purity of your shot.
- Purpose: Water helps dilute the potent concentrate, making it more palatable, and acts as a carrier for the beneficial compounds.
Optional Enhancers: Elevating Your Elixir to Peak Potency
This is where the true alchemy begins, allowing you to tailor your shot to specific health goals and flavor preferences.
-
Turmeric (The Golden Partner):
- Why it Works: Turmeric, another rhizome from the ginger family, contains curcumin, a potent anti-inflammatory and antioxidant compound. Its synergy with ginger is profound, amplifying the anti-inflammatory effects.
- Preparation: Treat it like ginger – organic, scrubbed, peeled if desired (it stains!).
- The Black Pepper Imperative: Curcumin has notoriously poor bioavailability. Always add a pinch of black pepper. Piperine, the active compound in black pepper, significantly enhances curcumin absorption by up to 2000%. Without it, you’re largely wasting your turmeric.
- Quantity: Start with a 1:2 or 1:3 ratio of turmeric to ginger.
-
Black Pepper (The Bioavailability Booster):
- Beyond Turmeric: Even without turmeric, black pepper adds a subtle warmth and can enhance the absorption of other nutrients. Always use freshly ground for maximum piperine content.
-
Cayenne Pepper (The Fiery Awakener):
- Benefits: Capsaicin, the active compound in cayenne, boosts metabolism, improves circulation, and can provide pain relief. It adds an intense, invigorating kick.
- Caution: Start with a tiny pinch! A little goes a very long way.
-
Honey or Maple Syrup (The Gentle Sweetener):
- Natural Sweetness: While I prefer my shots raw and intense, a touch of raw honey (for its antimicrobial and soothing properties) or maple syrup (a vegan option with antioxidants) can balance the sharpness for some palates.
- Judicious Use: Use sparingly. The goal is wellness, not a sugar rush.
-
Apple Cider Vinegar (ACV) (The Gut Ally):
- Benefits: Unfiltered ACV with "the mother" contains probiotics and prebiotics, supporting gut health, aiding digestion, and potentially helping with blood sugar regulation.
- Flavor Impact: It adds a tangy, acidic note that pairs surprisingly well with ginger and lemon.
-
Moringa Powder (The Nutrient Powerhouse):
- Superfood Boost: Moringa is packed with vitamins, minerals, amino acids, and antioxidants. A small spoon can significantly enhance the nutritional profile.
- Flavor: It has an earthy, slightly grassy flavor that can be masked by the strong ginger and citrus.
-
Adaptogens (The Advanced Alchemist’s Touch):
- For the truly knowledgeable, a small amount of powdered adaptogens like Ashwagandha (stress relief), Reishi mushroom (immune modulation), or Siberian Ginseng (energy, stamina) can be incorporated. Research their specific properties and recommended dosages.
My Journey of Experimentation:
My first shots were pure ginger and lemon. Potent, yes, but I craved more. The addition of turmeric and black pepper was a revelation – not just for the flavor, but for the profound reduction in systemic inflammation I felt. Cayenne was an acquired taste, but now a welcome kick on sluggish mornings. Honey became a rare treat, a reminder of ginger’s versatility. Each optional ingredient was a new brushstroke on my canvas, allowing me to paint a shot perfectly suited to my body’s current needs.
>
Chapter 3: The Alchemy – Methods of Extraction
The heart of your ginger shot lies in how effectively you extract the potent juices from the root. There are several paths to this alchemical process, each with its own advantages and considerations.
1. The Juicer Method (The Purist’s Path):
This is, unequivocally, the gold standard for pure, concentrated ginger shots. A good juicer efficiently separates the juice from the pulp, yielding a potent, smooth elixir.
-
Equipment:
- Slow Masticating Juicer (Cold Press): This is the preferred choice. It crushes and presses ingredients slowly, minimizing heat and oxidation, thus preserving enzymes and nutrients. The yield is higher, and the juice quality is superior. Brands like Omega, Hurom, or Kuvings are excellent.
- Centrifugal Juicer: These are faster and generally more affordable. They use a rapidly spinning blade to grate ingredients and then centrifugal force to separate juice from pulp. However, the high speed generates heat and incorporates more air, which can degrade some nutrients and enzymes.
-
Technique (for both types):
- Preparation: Wash ginger and turmeric (if using) thoroughly. If peeling, do so now. Cut ginger into pieces small enough to fit your juicer’s chute. Quarter lemons/limes (peeled or unpeeled, depending on your juicer’s power and your preference – many high-quality juicers can handle unpeeled citrus).
- Juicing: Feed the ginger and turmeric through the juicer. Alternate with lemon/lime pieces and any hard vegetables (like carrots or apples if you’re making a larger juice blend and want to push the ginger through effectively).
- Collection: Collect the concentrated juice.
- Additions: Stir in black pepper, cayenne, ACV, or any powdered adaptogens after juicing. Add water to dilute to your desired intensity.
- Cleanup: Clean your juicer immediately. Dried ginger pulp is notoriously difficult to remove.
-
Pros: Highest yield of pure juice, most potent, best nutrient preservation (especially with masticating juicers), smooth texture.
-
Cons: Expensive initial investment, takes up counter space, cleaning can be tedious.
2. The Blender Method (The Accessible Alchemist):
If a juicer isn’t in your arsenal, a high-speed blender is an excellent, more accessible alternative. The key here is effective straining.
-
Equipment:
- High-speed blender (Vitamix, Blendtec, Ninja, etc.)
- Fine-mesh sieve or, ideally, a nut milk bag or cheesecloth.
- Bowl for collecting juice.
-
Technique:
- Preparation: Wash and chop ginger and turmeric into small pieces (about 1/2 inch cubes). Quarter lemons/limes (peeled).
- Blending: Place chopped ginger, turmeric, and lemon/lime into the blender. Add a small amount of filtered water – just enough to get the blades moving and create a vortex (start with 1/4 to 1/2 cup for a small batch). Blend on high until completely pulverized into a fine, pulpy slurry. This might take 1-2 minutes. The goal is to break down the fibers as much as possible.
- Straining (The Crucial Step):
- Nut Milk Bag: Place the nut milk bag over a large bowl. Pour the blended mixture into the bag. Gather the top of the bag and squeeze firmly, extracting as much liquid as possible. This is the most efficient and cleanest method for straining.
- Fine-Mesh Sieve/Cheesecloth: Line a fine-mesh sieve with several layers of cheesecloth (or use a very fine sieve on its own). Place over a bowl. Pour the mixture into the sieve and use the back of a spoon to press down, forcing the liquid through. For maximum yield, you can gather the cheesecloth and squeeze by hand.
- Additions: Stir in black pepper, cayenne, etc. Dilute with more water to desired strength.
-
Pros: More affordable, uses existing kitchen equipment, retains some fiber if you don’t strain completely, can be very potent.
-
Cons: Requires significant straining, can be messier, pulp disposal, potentially less yield than a juicer.
3. The Grater & Press Method (The Traditionalist’s Approach):
This is the most low-tech method, reminiscent of traditional ginger tea preparations. It’s labor-intensive but requires minimal equipment.
-
Equipment:
- Fine grater (microplane or box grater)
- Cheesecloth or clean kitchen towel
- Bowl
-
Technique:
- Preparation: Wash and finely grate ginger and turmeric.
- Pressing: Place the grated ginger/turmeric into the center of a cheesecloth or thin, clean kitchen towel. Gather the edges to form a ball. Over a bowl, twist and squeeze the ball very firmly to extract the juice. This requires significant hand strength.
- Additions: Squeeze in fresh lemon/lime juice. Add other ingredients.
-
Pros: Requires no special equipment, very traditional.
-
Cons: Very low yield, extremely labor-intensive, messier, less potent than other methods.
My Own Methodological Evolution:
My ginger shot journey began with the blender and nut milk bag – a messy but effective initiation. I spent many mornings squeezing pulp, my hands tingling with the scent of ginger. The day I invested in a slow masticating juicer was a game-changer. The ease, the higher yield, the superior quality of the juice… it transformed the ritual from a chore into a joy. While I still appreciate the accessibility of the blender, the juicer became my preferred tool for consistent, high-quality shots.
>
Chapter 4: The Art of Perfection – Tips for the Best Shot
Making a good ginger shot is easy; crafting the best ginger shot is an art form, refined through attention to detail and a deep understanding of your ingredients.
1. Ingredient Quality is Non-Negotiable:
- Organic First: Always prioritize organic ginger, turmeric, and citrus. This reduces pesticide exposure and often means more vibrant, nutrient-dense produce.
- Freshness: The fresher the better. Old, shriveled ginger will have less juice and diminished potency. Store ginger in a paper bag in the crisper drawer of your fridge for maximum freshness.
2. Master the Ratios – Find Your Golden Blend:
- There’s no single "perfect" ratio, as intensity is subjective. However, a good starting point for a potent shot (approx. 2 oz) is:
- Ginger: 1.5 to 2 inches (about 1.5-2 oz weight)
- Lemon/Lime: 1/2 whole fruit
- Water: 1-2 tbsp (or more to dilute)
- Turmeric: 0.5 to 1 inch (if using)
- Black Pepper: Tiny pinch (always with turmeric)
- Cayenne: Even tinier pinch (optional)
- Experiment: Start with a milder ratio and gradually increase ginger/turmeric until you find your sweet spot. The goal is to feel the invigorating kick without overwhelming your palate.
3. Cold Extraction for Maximum Potency:
- Avoid any heat during the extraction process. Heat can degrade some of the delicate enzymes and volatile compounds in ginger and citrus. This is why slow masticating juicers are superior to centrifugal ones and why boiling for a "tea" will yield different benefits.
4. To Strain or Not to Strain? (The Pulp Debate):
- Fully Strained (My Recommendation for Shots): For a true "shot," a smooth, concentrated liquid is preferred. Straining removes fibrous pulp, making it easier to consume quickly and ensuring maximum potency per sip. This is especially true if you’re using a juicer.
- Partially Strained/Pulp-Inclusive (Blender Method): If using a blender and you don’t mind a slightly thicker texture, you can strain less. The remaining pulp contributes fiber, which is beneficial for digestion. This makes it more akin to a very concentrated smoothie. Understand that the feel and immediate impact will be different.
5. Sweetener Wisdom:
- If you find the shot too intense, add a minimal amount of raw honey or maple syrup after the juice is extracted. Never add sugar. The goal is a health tonic, not a sugary drink.
6. Boosting Bioavailability (Revisited):
- Black Pepper: As mentioned, crucial for turmeric absorption.
- Healthy Fats: While not typically added directly to a shot, consuming your shot alongside a meal containing healthy fats (avocado, nuts, seeds, olive oil) can subtly enhance the absorption of fat-soluble compounds in ginger and turmeric.
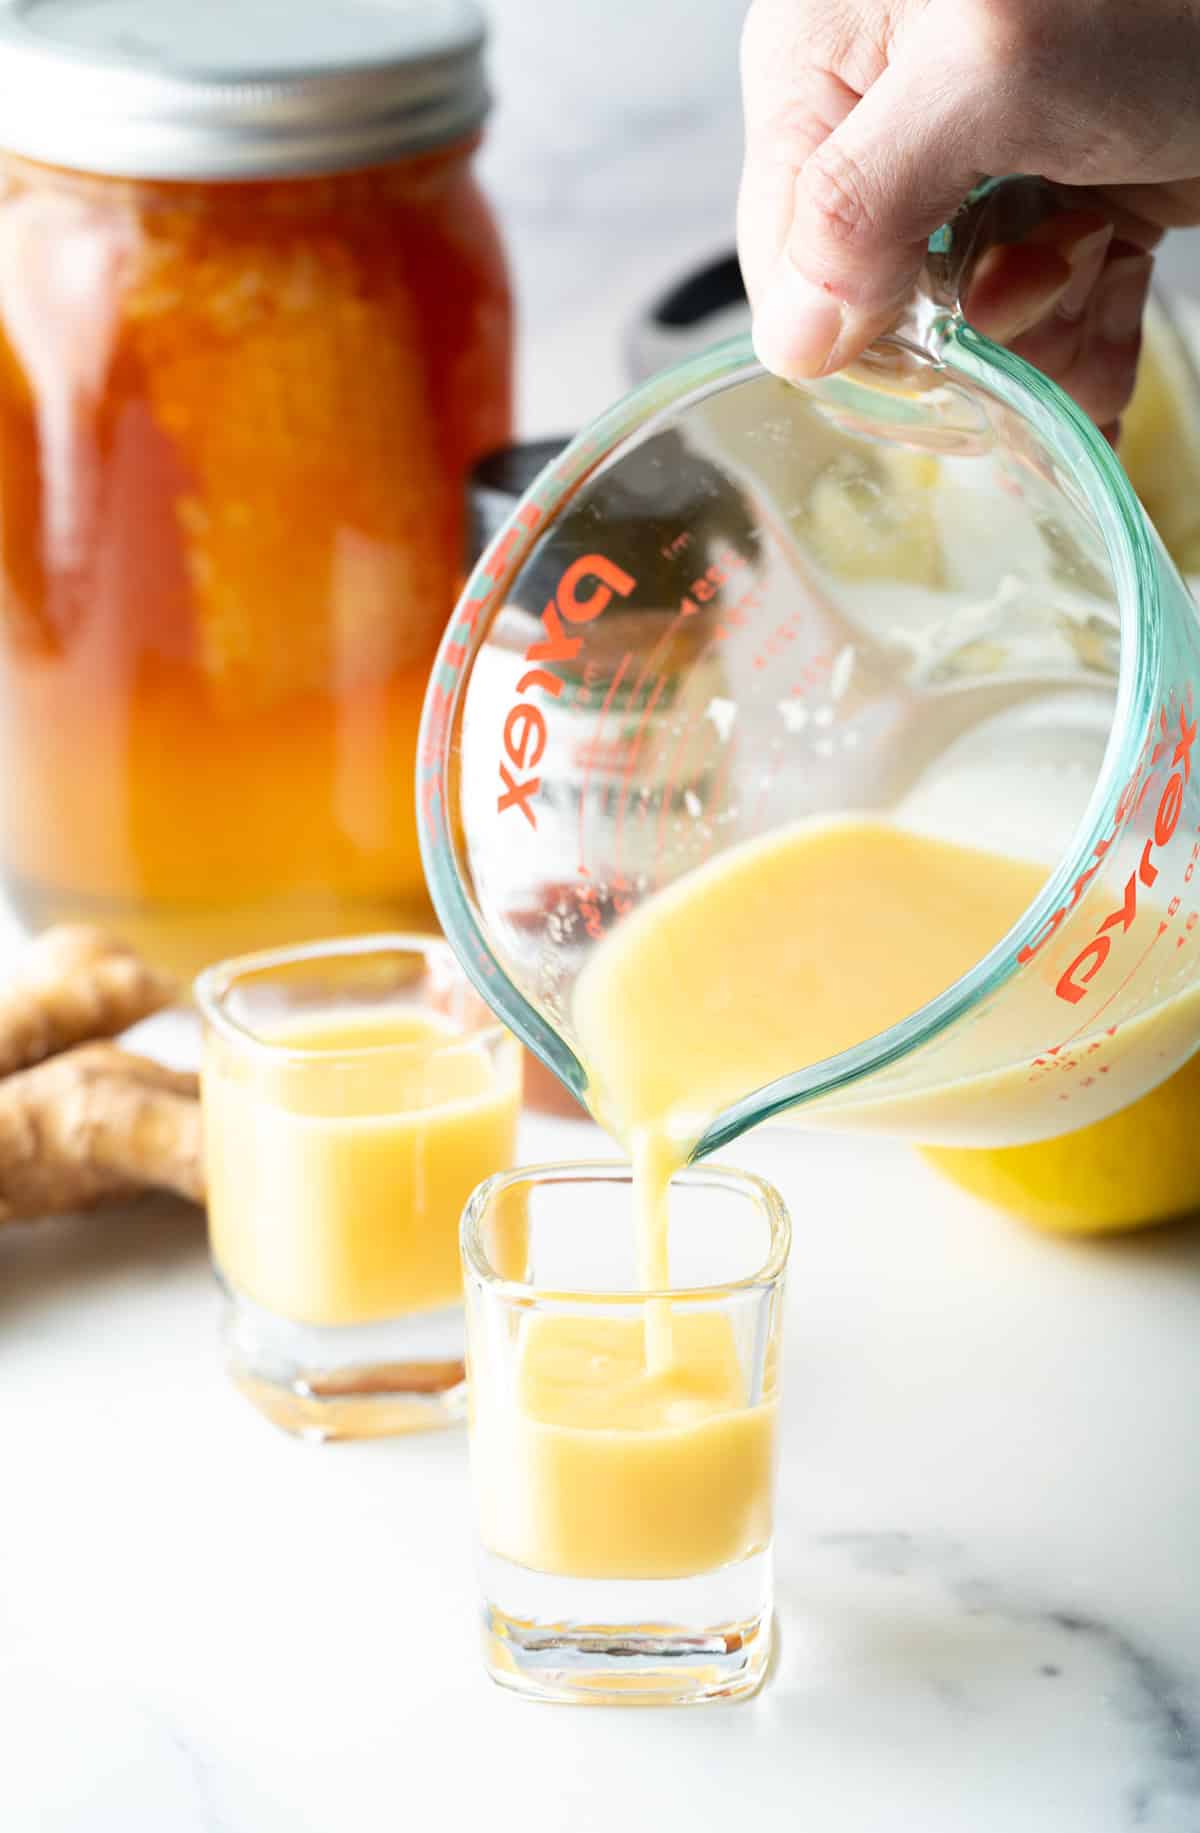
7. Batch Making & Strategic Storage:
- Efficiency: Make larger batches (e.g., a week’s supply) to save time.
- Containers: Store in airtight glass bottles or jars. Glass is preferred to avoid plastic leaching. Small 2-4 oz bottles are perfect for single servings.
- Refrigeration: Fresh ginger shots will keep well in the refrigerator for 3-5 days. After this, potency and freshness begin to decline, though they may still be safe to consume for a few more days.
- Freezing for Longevity: For longer storage, freeze your shots! Pour them into ice cube trays. Once frozen, transfer the cubes to a freezer-safe bag or container. This extends their shelf life to several weeks, even months, with minimal loss of potency. Simply thaw a cube or two in a small amount of water overnight in the fridge or at room temperature for a quick shot.
My Personal Refinements:
My initial shots were often too diluted, lacking the punch I craved. Then they were too intense, making me cough. It was a dance of trial and error. I learned the hard way that leaving unpeeled organic ginger unscrubbed led to an earthy, almost muddy flavor. I discovered the profound difference between a fine-mesh sieve and a nut milk bag. And the revelation of freezing them in ice cube trays? Pure genius for consistency and convenience, especially during busy weeks. These small refinements are what elevate a simple recipe into a personalized, potent elixir.
>
Chapter 5: Beyond the Shot – Integrating into Your Life
A powerful ginger shot is more than just a drink; it’s a tool, a ritual, a potent ally in your daily wellness arsenal. Knowing when and how to incorporate it can optimize its benefits.
When to Take Your Shot:
- First Thing in the Morning (My Favorite): This is arguably the most popular and impactful time. It kickstarts your metabolism, invigorates your senses, and prepares your digestive system for the day ahead. It’s a natural, potent alternative to coffee for many, providing sustained energy without the jitters.
- Before Meals: A shot 15-30 minutes before a heavy meal can prime your digestive enzymes and help prevent post-meal bloating and discomfort.
- Pre-Workout: The circulatory and anti-inflammatory benefits of ginger can enhance blood flow to muscles and potentially reduce exercise-induced soreness.
- Post-Workout: To aid in recovery and reduce muscle inflammation.
- During Illness: When you feel a cold or flu coming on, a ginger shot can provide immune support and help alleviate symptoms like congestion and nausea.
- Mid-Afternoon Slump: Instead of reaching for another coffee or sugary snack, a ginger shot can provide a clean, natural energy boost.
Dosage and Listening to Your Body:
- Start Small: If you’re new to ginger shots, begin with a smaller dose (e.g., 1 ounce) or a more diluted shot.
- Listen to Your Body: Pay attention to how you feel. Some people thrive on a daily shot, others prefer a few times a week. If you experience any digestive upset, reduce the amount or frequency.
- Consistency is Key: Like any wellness practice, consistency over time yields the best results.
Potential Side Effects and Contraindications (For the Knowledgeable):
While ginger is largely safe for most people, it’s potent, and awareness is key:
- Heartburn/Acid Reflux: In some sensitive individuals, the acidity and spiciness of ginger shots can exacerbate heartburn. Taking it with food or diluting it further can help.
- Blood Thinners: Ginger has mild anti-platelet (blood-thinning) properties. If you are on prescription blood-thinning medication (e.g., Warfarin, Aspirin), consult your doctor before regular, high-dose ginger consumption.
- Gallstones: High doses of ginger might increase bile secretion, which could be an issue for individuals with gallstones. Consult a doctor.
- Pregnancy: While ginger is often recommended for morning sickness, concentrated shots might be too potent. Always consult your healthcare provider during pregnancy.
- Blood Sugar Medication: Ginger may lower blood sugar. If you are diabetic and on medication, monitor your blood sugar levels closely and consult your doctor.
- Surgery: Due to its potential effect on blood clotting, discontinue ginger shots at least two weeks before any scheduled surgery.
Creative Uses for Leftover Pulp:
Don’t let that precious fiber go to waste!
- Ginger Tea: Steep the pulp in hot water for a comforting, milder ginger tea.
- Baking: Incorporate finely blended pulp into muffins, quick breads, or cookies for a subtle ginger flavor and added fiber.
- Smoothie Booster: Add a spoonful to your morning smoothie for extra fiber and zing.
- Compost: If all else fails, return it to the earth!
My Daily Ritual and Its Transformation:
Incorporating a daily ginger shot into my morning routine has been a profound shift. It’s no longer just about the physical benefits; it’s about the mental clarity, the sense of purpose, and the empowering feeling of actively nurturing my body. It’s a moment of mindful self-care, a fiery salute to the day ahead. I’ve seen my digestion improve, my energy levels stabilize, and my overall resilience strengthen. It’s a testament to the idea that small, consistent acts of self-care can lead to monumental shifts in well-being.
>
Conclusion: You, The Master Alchemist
The journey to making the best homemade ginger shots is one of exploration, understanding, and personal refinement. It began with a simple question and evolved into a profound appreciation for the power of nature’s pharmacy. We’ve explored ginger’s ancient roots and its modern scientific validation, dissected the role of each ingredient, mastered various extraction techniques, and learned the nuances of perfection and integration.
You are now equipped not just with a recipe, but with knowledge – the knowledge to choose the finest ingredients, to understand their synergistic effects, and to tailor your elixir to your unique body and lifestyle. You are no longer merely consuming; you are creating. You are no longer just drinking; you are nourishing.
So, step into your kitchen, embrace the vibrant aroma of fresh ginger, feel the texture of the root in your hands, and prepare to unleash its potent magic. With each fiery, golden shot, you’re not just taking a dose of wellness; you’re affirming your commitment to a vibrant, energized, and deeply nourished life. Cheers to your health, your curiosity, and your newfound mastery as the alchemist of your own well-being.